Showing posts with label Cupcakes. Show all posts

Sesame Street Cake and Cupcakes


I was recently asked to make these Sesame Street cupcakes and "smash" cake for a little boy's first birthday. I couldn't help but say yes. I had tried my hand at these before but it was some time ago (see those HERE) and I knew I wouldn't ever be making them for my own kids again. Sadly, our Sesame Street days are already over. And much too soon for my liking :(

Below are instructions and tips on how I made these. If you have any additional questions, please leave a comment below...Thanks!

The "Smash" Cake

- Bake a 2-layer cake. Use your favorite recipe. This cake was classic vanilla.
- The birthday boy's mom asked for a small cake. The smallest cake pan I had was 5" which I thought might still be bigger than she would like. So, I baked the cake in one 9" cake pan and then used a 4" ring cutter to get the two layers. I thought the cake was the perfect size.
- Dye frosting your favorite color. I used a very pale blue here so I didn't need to add a lot of food coloring.
- Frost the cake with a crumb coat first and then another layer of frosting. Smooth out the frosting. Here is a post on how I smooth out my frosting.
- To make the sign I used Wilton's fondant, dyed it green and yellow. See this post for a few more tips on how to work with fondant.
- Apply the sign to the cake and press gently to have it adhere.
- The use a tiny round tip (this was a Wilton's #3) to write the number and name on the sign.
- Finally add a decorative boarder at the base of the cake and on top to give it a finished look.

Elmo Cupcakes

- Dye the frosting red. You will need A LOT of food coloring to get a true red frosting needed for Elmo.
- Apply frosting to the cupcake using a small star shaped tip.
- Add candy eyes*.
- Add a nose. These are just orange colored peanut M&M's. Buy the big bag of M&M's b/c the single serving bags (that you find near the check out register) will only have 3-4 orange per bag.
- Add a mouth. This mouth is made from an Oreo cookie. I twisted the cookie apart, used a sharp knife to scrape off the white cream center and then cute it in half.

Cookie Monster Cupcakes

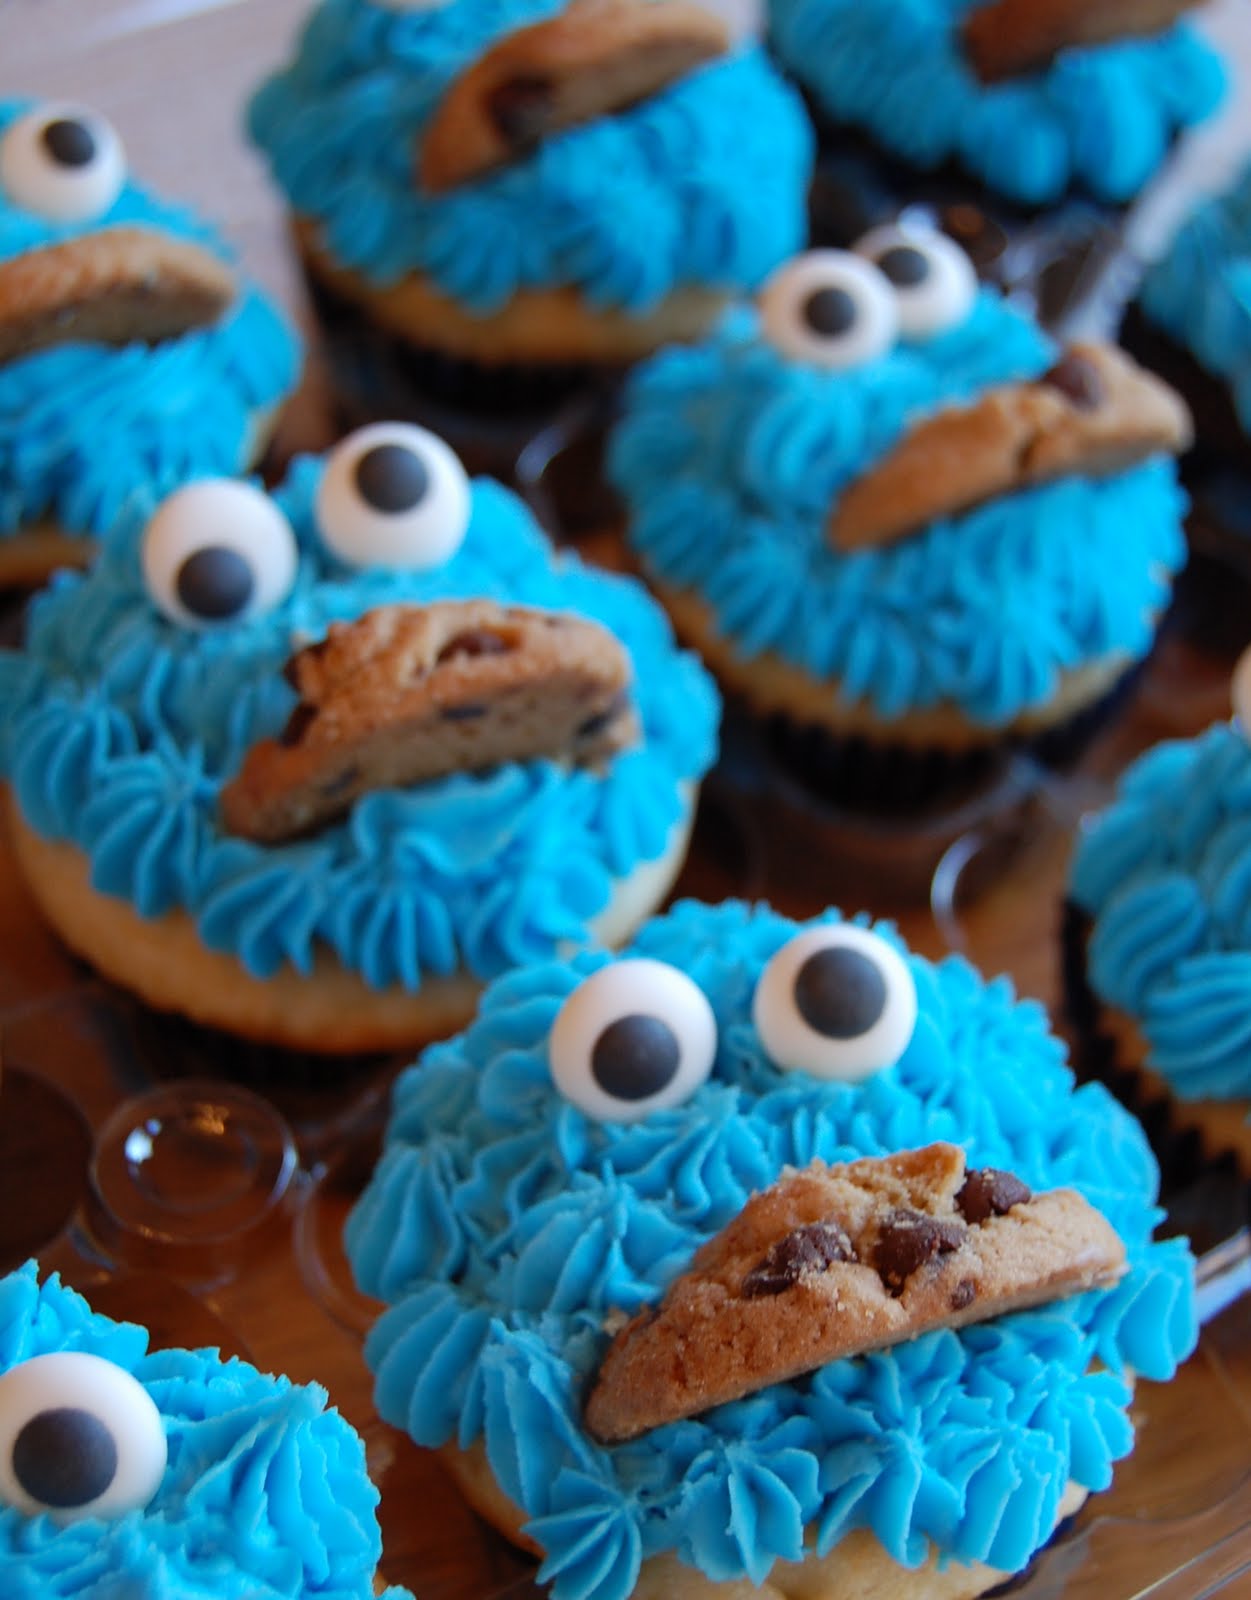
- Dye the frosting blue. You will not need a lot of food coloring to get the right shade. So start with just a little and add more as needed.
- Apply frosting to the cupcake using a small star shaped tip. I used the same tip that I used for Elmo.
- Add candy eyes*.
- Add a cookie. These cookies are the Famous Amos mini cookies (cut in half). They were the perfect size, not too big, not too little.

Oscar the Grouch Cupcakes

- Dye the frosting green. I added just a tiny bit of brown food coloring here too to give green a bit more of an olive hue.
- Apply frosting to the cupcake using a grass shaped tip.
- Add candy eyes*.
- Add a mouth. This mouth is made from an Oreo cookie also.
- Add a tongue. Just pipe a small amount of red frosting into the center of the mouth. I used leftover frosting from the Elmo cupcakes
- Add eyebrows around the top half of the eyeballs. Use brown frosting for this and a very small star shaped tip.

More Tips:
- *I cheated and bought candy eyeballs from a local cake supply store to save time. There are a few ways to make these at home but that is a post all on it's own. If anyone wants to see that, please let me know and I will post a tutorial.
- Give yourself some time to make these, at least two days. Try baking the cake and cupcakes one day. Then make the frosting and decorate the next.
- I used coordinating greaseproof liners (red, blue and green) to match the cupcakes.
- Making several different frosting colors it is helpful to use this plastic wrap technique (aka..."the frosting condom") to save pastry bags and make clean-up easier.


Here is the birthday boy enjoying his first taste of cake. How cute is he??!! Happy 1st birthday Maddox!

Thanksgiving Food Favorites


Just a quick post today....

Hope you all have a very HAPPY THANKSGIVING....gobble gobble!!

Sweet Potato Brulee


Turkey Cupcake Bites


Honey-Poppyseed Butter


Cranberry Sauce


Pumpkin Cheesecake

Ballerina Cupcakes


Here is a cute way to personalize cupcakes for the little princess in your life. I made these recently for a play date my daughter had with her 3 best friends. The girls are all in the same preschool and ballet class together. They love ballet so much, that I thought these would make for an extra special treat.


This was a simple homemade vanilla cake (yes, I do use cake mix from a box too) with a simple vanilla Swiss meringue frosting.


To make the ballerina cupcake toppers, I used card stock, a lollipop stick, ribbon and letter stickers.

First, cut out two leotards out of heavy card stock. Click HERE for the template. Then add a lollipop stick to the middle of the leotard (tape in place) and glue both pieces together. The tutu's were made out of wide wire rimmed ribbon and finally a sticker with each girl's initials completed the look.


The girls having fun in ballet class.


Source: Inspired by Glorious Treats

Cupcake Challenge


What a fun weekend I had! This past Saturday, I competed in a "Cupcake Challenge" as part of the National Capital Area Cake Show. The challenge featured 50 bakers (both professional and amtuer) and almost 200 different varieties of cupcakes.

The theme for this year's challenge was "cocktail" inspired cupcakes. Here is what I made:

Grasshopper Cupcake (rich chocolate cake with creme de menthe buttercream)

Blue Hawaiian Cupcake (coconut cake with a rum buttercream frosting, graham cracker "sand" and a fondant flip flop garnish)

Shirley Temple Cupcake (lemon-lime cake with a cherry grenadine buttercream)

I'm glad I took some pictures at home before the show b/c we were so busy and didn't get to take many while there.

My neighbor, Polly, also competed in the challenge. Polly and I both love to bake and since we often get requests for baked goods we've decided to join forces and start a home baking business. This is our website, Sugar Lane Sweets*.

These were Polly's cupcakes:

Orange Blossom Cupcake (my favorite...loved these!)

Irish Cream Cupcake

Chocolate Cherry Cordial Cupcake


This event was sold out about a week before the show. When the doors opened at 7PM hundreds of people filed in to purchase cupcakes. It was crazy, busy, overwhelming and a lot of fun!


Polly working her table.


I didn't get a chance to snap any pictures of my set-up before the show. I took this picture half-way through the event. By this point, my grasshopper cupcakes were almost gone and 15 minutes later my Shirley Temple cupcakes were also sold out.

Some people had some pretty neat displays.


And there were a lot of creative and amazing cupcakes.


The Washington DC area loves cupcakes!


Look at these cute "Tartini" cupcakes.


Another great display.


* Polly's husband, CJ, built our site. If you would like to contact him about any website work, feel free to send me (mbrandao0508@gmail.com) and I will forward his info.

Funfetti Cake and Cupcakes


I know it's been a while since my last post but unfortunately we all got hit with a nasty cold bug here. I am so happy we are all healthy again!

This is of course a birthday cake. I made it for my son's birthday party ( which we held it at a local inflatables play place). I used a box funfetti cake and just added in an extra 1/4 cup of sprinkles for more color.


A homemade, bakery-style buttercream and fondant Lego pieces went on top. The kids didn't realize these weren't real and I had to tell them that, Yes...they could it them!


I also made a small 6-inch cake out of the same batter.


I had a originally planned a completely different cake, but after the week I had this was about all I could muster. And you know what...it was just fine :)

Neapolitan Cupcakes


I have some dinner recipes ready to go but instead of those, I'm going to show you cupcakes today....yes, I'm a bad influence :)

OK, so about a week ago I got the brilliant idea of making a Neapolitan cupcake. I started searching online but couldn't find the type of recipe I was looking for. Most of the Neapolitan cupcake recipes consisted of a marble cake with some pink frosting. I knew that wasn't exactly what I was looking for and decided to just whip up what I had in mind using my favorite vanilla cake as a base.


I really like Dorie Greenspan's perfect party cake recipe and decided to pair that with a chocolate mousse filling. Then topped it off with a luscious strawberry Swiss meringue buttercream....Oh, YEAH!


The cake and buttercream where made from scratch, the chocolate mousse came from a box. It was perfect not to mention a huge time saver.


Cupcakes are best shared and a brought these over to my neighbor's who was kind enough to let me use her washer b/c mine had just died. BTW, isn't this box cute? I got a couple of these from a friend for Christmas. Thanks again Jen--they are so cute!!

Ingredients:

Cake:

2 1/4 cups cake flour
1 tablespoon baking powder
1/2 teaspoon salt
1 1/4 cups whole milk or buttermilk
4 large egg whites
1 1/2 cups sugar
2 teaspoons grated lemon zest
1 stick (8 tablespoons) unsalted butter, at room temperature
1/2 teaspoon pure lemon extract

Buttercream:
1 cup sugar
4 large egg whites
3 sticks (12 ounces) unsalted butter, at room temperature
1/2 cup fresh strawberry puree (puree fresh strawberries into a very fine consistency)
1/2 teaspoon pure vanilla extract
1/2 teaspoon of lemon juice
pink food coloring (tiny amount, just to bring out the color of the frosting)

Filling:
1 box of chocolate mousse mix (and the additional ingredients needed to make the mousse)

Toppings:
white and brown sprinkles

Directions:

1. Prepare chocolate mousse according to box instructions. Refrigerate for at least an hour or until ready to use.

2. Preheat the oven to 350 degrees F. Line a muffin pan with 24 cupcake liners, set aside.

3. For the Cake: Sift together the flour, baking powder and salt.

4. Whisk together the milk and egg whites in a medium bowl.

5. Put the sugar and lemon zest in a mixer bowl or another large bowl and rub them together with your fingers until the sugar is moist and fragrant.

6. Add the butter and, working with the paddle or whisk attachment, beat at medium speed for a full 3 minutes, until the butter and sugar are very light. Beat in the extract, then add one-third of the flour mixture, still beating on medium speed.

7. Beat in half of the milk-egg mixture, then beat in half of the remaining dry ingredients until incorporated. Add the rest of the milk and eggs, beating until the batter is homogeneous, then add the last of the dry ingredients.

8. Finally, give the batter a good 2-minute beating to ensure that it is thoroughly mixed and well aerated. Divide the batter between the muffin pan.

9. Bake for 18 to 22 minutes, or until the cupcakes are well risen and springy to the tough – a toothpick inserted into the centers should come out clean. Transfer the cupcakes to cooling racks and cool for about 5 minutes, then remove from pan and continue cooling on the rack.

9. For the Buttercream: Put the sugar and egg whites in a mixer bowl or other large heatproof bowl, fit the bowl over a pan of simmering water and whisk constantly, keeping the mixture over the heat, until it feels hot to the touch, about 8 minutes. The sugar should be dissolved, and the temperature should be around 150 degrees. Remove the bowl from the heat.

10. Working with the whisk attachment or with a hand mixer, beat the meringue on medium speed until it is cool, about 8 minutes. Add the butter a stick at a time, beating until smooth.

11. Once all the butter is in, and the strawberry puree and vanilla. Beat the buttercream on medium-high speed until it is thick and very smooth, 6 to 10 minutes. Then add in the lemon juice and a tiny bit of food coloring and continue beating for 1-2 minutes. During this time, the buttercream may curdle or separate – just keep beating and it will come together again.

12. To Assemble the cupcakes: Put a some chocolate mousse in a piping bag fitted with a tip like THIS. Insert the tip into the cupcake and gently squeeze in the chocolate mousse filling. Then place frosting in another piping bag fitted with a star tip. Pipe frosting on top of the cupcake and put white and chocolate sprinkles on top.

Source: Cake: Dorie Greenspan, Inspiration Chef Mommy

Chocolate Cupcakes with Peppermint Buttercream


I made these cupcakes for a holiday party last week that my husband's friend was hosting. It was a bit of a hectic weekend (who isn't having one of those right now though?). So, I wanted to keep the cake, frosting and decorations simple but still festive.

I'm sure you will recognize the edible snowflakes from these sugar cookies. The chocolate cake is the classic Hershey's recipe, which I like but I really need to find one that is less messy. The addition of boiling water at the end leaves the batter very thin (bakes perfectly though) and this makes it tough to neatly fill the cupcake liners. A good idea is to have a damp cloth handy when filing the liners to quickly clean up any spills.


The frosting is another classic and my "go to" ..Swiss meringue buttercream. The addition of peppermint here pairs really well with the chocolate cake.

I became kind of obsessed with these little snowflakes. I added them to all sorts of sweets, including these cakeballs that I made as teacher gifts.


Ingredients:
For the cake

2 cups plus 2 tbsp. sugar
1¾ cups all-purpose flour
¾ cup plus 1 tbsp. cocoa powder
1½ tsp. baking powder
1½ tsp. baking soda
1 tsp. salt
2 large eggs
1 cup whole milk
½ cup vegetable oil
2 tsp. vanilla extract
1 cup boiling water

Directions:

Preheat the oven to 350° F. Line two cupcake pans with paper liners.

To make the cake batter, sift together the sugar, flour, cocoa powder, baking powder, baking soda and salt in the bowl of an electric mixer fitted with the paddle attachment; mix on low speed just to combine. In a mixing bowl, combine the eggs, milk, vegetable oil and vanilla extract; whisk together. Add to the dry ingredients and mix on low speed for 30 seconds. Scrape down the sides of the bowl, then beat on medium speed for 2 minutes. Add the boiling water and stir just to combine (batter will be very thin).

Divide the batter evenly between the prepared cupcake liners, filling each about ¾ of the way full. Return the pans to the oven and bake about 18-20 minutes, until a toothpick inserted in the center comes out clean, rotating the pans halfway through baking. Allow to cool in the pans 5-10 minutes, then remove and transfer to a wire rack to cool completely.

For the frosting:
4 egg whites
1 1/4 cup granulated sugar
1/4 tsp salt
1 1/2 cup (3 sticks) unsalted butter, at room temperature
2 teaspoons peppermint extract (more if you like it really minty)
1/2 teaspoon vanilla extract
blue food coloring gel

Directions:

Put egg whites, salt and sugar in a double boiler over simmering water. Whisking constantly, cook until sugar has dissolved and mixture is warm (about 160 degrees).

Pour heated egg mixture into a clean bowl of a mixer fitted with the whisk attachment. Beat egg white mixture on high speed until it forms stiff (but not dry) peaks. Continue beating until fluffy and sides of the bowl have cooled, about 8 minutes (It's very important to beat it for the whole 8 minutes).

Switch to the paddle attachment. With mixer on medium-low, add butter several tablespoons at a time, beating well after each addition. (If frosting appears soupy or separated after all butter has been added, beat on medium-high speed until smooth again, 3 to 5 minutes more.)

Beat in extracts and food coloring. Reduce speed to low; beat 2 minutes to eliminate air bubbles. Stir with a rubber spatula until smooth.

Source: adapted from Martha Stewart

Turkey Cupcakes Bites


I would have liked to have posted this sooner but I only made them for "real" today....for my daughter's preschool Thanksgiving lunch.

Let me say that they can be a bit time consuming and not the type of treat that can be made last minute. I made the fondant turkey heads last Friday and the feathers were made on Sunday. Last night, I made the cake (from a box), added the frosting (I used canned, which I usually hate but needed something quick) and then assembled the cakes (the easy part).

What you need:

Chocolate mini cupcakes
Chocolate frosting (canned or homemade)

White, brown, yellow and red fondant (homemade or pre-made, such as Wiltons)
Black edible marker (can be found at Michaels)

Dark chocolate, orange and yellow candy melts (such as Wiltons)


To make the turkey heads: (can be made up to 5 days in advance, then store in an airtight container)


1. Roll out the brown fondant into a log. Cut the log down to 1 1/2- 2 inch pieces. Shape these pieces into a turkey head shape, tapering at the neck.
2. Shape small pieces of the yellow fondant to form a beak and attach to the head.
3. Roll 2 very small pieces of white fondant to form the eyes and attach above he beak.
4. Dot the eyes with the black edible marker.
5. Take a small piece of red fondant and shape it to look like the gizzard, attach below the beak. Place the turkey heads in an air-tight container until ready to assemble the cupcakes.
*If the fondant pieces aren't staying attached to each other, simple brush a small amount of water to one side to act as a glue.

To make the turkey feathers: (can be made up to 2 days in advance, then store in an airtight container)
Technique is similar to these butterflies.

1. Draw a template of the feathers on a piece of paper. Set aside.

2. Place candy melts in plastic baggies. Seal the baggies, leaving a small opening for air to escape. Microwave at 15-20 second intervals till candies and completely melted. Snip a tiny part of the tip of the bag.
*You will probably have to microwave the melts as you go along, since these harden quickly.

3. Cut a piece of parchment paper. Place the parchment paper on top of the template. Start by tracing the template with the dark chocolate and let that harden. Then fill the feathers with the yellow and orange melts. Use a toothpick to help spread the melts. Let the turkey feathers harden completely before removing from parchment paper.


To assemble the turkeys:

Frost the cupcakes, add the turkey head and the feathers.


What is my daughter thankful for? Desserts! This is how she ate her turkey cupcake...with a cakepop in the other hand :)


Source: Chef Mommy Original