Showing posts with label Christmas. Show all posts

Nutty Reindeer Treats


Here is another holiday treat I made recently. I saw these on another blog and thought....HOW CUTE!!!

These were made for my daughter's preschool Christmas pageant luncheon. I really would have liked to have taken step-by-step photos but I made these the night before and was in a bit of a rush. They are made with a Nutter Butter cookie that is dipped in chocolate (I brushed on the chocolate), then decorated with a red M&M for the nose, candy eyes* and pretzels for antlers.

Please click HERE for instructions on how to make these.

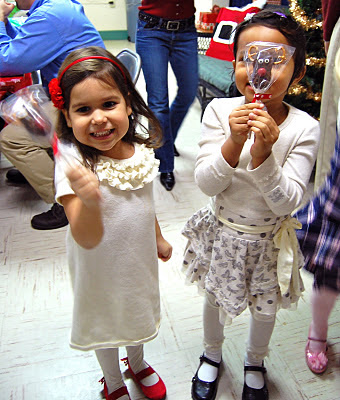
My little angel (center with the red hairband) performing in the school's annual Christmas pageant.


The kids loved these!!


I individually wrapped each reindeer in a cookie baggie and tied it with a festive ribbon. This kept the cookies fresh and made them an easy take-home treat.


*These are the candy eyes. You can find them at a store like Michaels.

White Snowflake and Christmas Tree Sugar Cookies


I still owe you all the second slow-cooker mushroom chicken recipe but I'm holding off on that for a bit, so I can bring you some holiday goodies instead :)

I made these snowflake and Christmas tree cookies for my neighbor's annual cookie exchange party. I knew there were going to be some amazing tasting treats at the party, but I decided to good for looks mostly this year...and these fit the bill!


I used my regular sugar cookie and royal icing recipe.

I was given a sample of Dave's Dirty Vanilla to try out and used it in this recipe. So, why is it called "dirty vanilla"? Well, Dave was frustrated with the sub-par vanilla extracts he was using for baking and after much experimenting developed a cold extraction process that yields a vanilla with more subtle flavors and aroma. There is a Madagascar Bourbon vanilla bean in each bottle of Dave's Dirty Vanilla! I loved the "dirty" part....the little specks of vanilla seed! To learn more or buy some of Dave's Dirty Vanilla visit his site HERE.


I think the all white cookies look so pretty and sophisticated but the really reason I made them this way was out of sheer laziness-LOL. I didn't want to have to mess with making several different colors for the frosting.


My daughter appreciated both the look and taste of these cookies :)

French Toast Casserole


This is the french toast casserole I made for Christmas morning. I assembled it the night before and in the morning it baked while the kids opened presents. It was served with some maple syrup on top and fresh sliced strawberries on the side.

The recipe is listed below but I'll be honest, I didn't measure out the ingredients, just eyeballed them. I also started with about 3/4 of challah (due to some earlier snacking by hubby and the kids).


I was a little nervous when I pulled it out the oven because it looked a little dry to me. It tasted perfect though and this is a terrific, simple recipe for any special breakfast or weekend morning.

Ingredients:

4 Tbs butter, melted
1/2 c. light brown sugar
1 loaf challah or brioche (I used challah) cut into 1″ slices
8 eggs
1 c. whole milk
2 tsp cinnamon
pinch each of nutmeg and ginger
1 c. chopped pecans

Directions:
Pour butter into bottom of 9×13 baking pan. Sprinkle with brown sugar. Arrange bread in baking pan, ripping pieces in half as necessary to cram everything in there in a semi-even way. Mix remaining ingredients, whisking until eggs are broken up and well combined. Pour over bread. Let stand 3-12 hours (I made mine the night before.)

When ready to cook, bake at 350 for 35-40 minutes. Mine was done at 35, and the top was a little bit crunchy. Serve with maple syrup.


Source: Erin'sEasyEats

Happy Holidays!


I will be taking a little break to catch up on last minute holiday errands, cleaning my house (god, does it need it this week!!) and spending time with my family.

We are having a low key Christmas this year, just the four of us. I'm not even sure about everything on the menu but here is what I'm thinking so far....this Seafood Lasagna for Christmas Eve dinner, White Chocolate Raspberry Truffle Cheesecake for dessert, French Toast Casserole for Christmas morning and maybe some Cinnabon Popcorn to snack on. Other than that, I'm out of ideas...so, if you don't mind...what's on your holiday menu this year?

Happy Holidays!!

Snowflake Sugar Cookies


I made these snowflake sugar cookies for my daughter's preschool Christmas show luncheon. They were very appropriate too since the day before the show we got a good amount of snow here in the DC area.


I had also planned to make some cute Santa cupcakes I had seen on Spring Lake Cakes but due to the snow, we weren't sure the show or luncheon would be happening. The thought of having 40+ Santa cupcakes at home was a little scary, so I decided to just keep it simple and stick with the cookies.

I wrapped them individually to keep them fresh and also so people could take them home easily.


For the cookie and royal icing recipe, click HERE.

I have to share some pictures of my daughter from the Christmas show. She was a little lamb :)


She is only 2.5 yrs. old so I wasn't really sure what to expect but she did great...all the kids did!


I was so proud of her!!


Me and my girl.....love, love, love her!!

Chocolate Cupcakes with Peppermint Buttercream


I made these cupcakes for a holiday party last week that my husband's friend was hosting. It was a bit of a hectic weekend (who isn't having one of those right now though?). So, I wanted to keep the cake, frosting and decorations simple but still festive.

I'm sure you will recognize the edible snowflakes from these sugar cookies. The chocolate cake is the classic Hershey's recipe, which I like but I really need to find one that is less messy. The addition of boiling water at the end leaves the batter very thin (bakes perfectly though) and this makes it tough to neatly fill the cupcake liners. A good idea is to have a damp cloth handy when filing the liners to quickly clean up any spills.


The frosting is another classic and my "go to" ..Swiss meringue buttercream. The addition of peppermint here pairs really well with the chocolate cake.

I became kind of obsessed with these little snowflakes. I added them to all sorts of sweets, including these cakeballs that I made as teacher gifts.


Ingredients:
For the cake

2 cups plus 2 tbsp. sugar
1¾ cups all-purpose flour
¾ cup plus 1 tbsp. cocoa powder
1½ tsp. baking powder
1½ tsp. baking soda
1 tsp. salt
2 large eggs
1 cup whole milk
½ cup vegetable oil
2 tsp. vanilla extract
1 cup boiling water

Directions:

Preheat the oven to 350° F. Line two cupcake pans with paper liners.

To make the cake batter, sift together the sugar, flour, cocoa powder, baking powder, baking soda and salt in the bowl of an electric mixer fitted with the paddle attachment; mix on low speed just to combine. In a mixing bowl, combine the eggs, milk, vegetable oil and vanilla extract; whisk together. Add to the dry ingredients and mix on low speed for 30 seconds. Scrape down the sides of the bowl, then beat on medium speed for 2 minutes. Add the boiling water and stir just to combine (batter will be very thin).

Divide the batter evenly between the prepared cupcake liners, filling each about ¾ of the way full. Return the pans to the oven and bake about 18-20 minutes, until a toothpick inserted in the center comes out clean, rotating the pans halfway through baking. Allow to cool in the pans 5-10 minutes, then remove and transfer to a wire rack to cool completely.

For the frosting:
4 egg whites
1 1/4 cup granulated sugar
1/4 tsp salt
1 1/2 cup (3 sticks) unsalted butter, at room temperature
2 teaspoons peppermint extract (more if you like it really minty)
1/2 teaspoon vanilla extract
blue food coloring gel

Directions:

Put egg whites, salt and sugar in a double boiler over simmering water. Whisking constantly, cook until sugar has dissolved and mixture is warm (about 160 degrees).

Pour heated egg mixture into a clean bowl of a mixer fitted with the whisk attachment. Beat egg white mixture on high speed until it forms stiff (but not dry) peaks. Continue beating until fluffy and sides of the bowl have cooled, about 8 minutes (It's very important to beat it for the whole 8 minutes).

Switch to the paddle attachment. With mixer on medium-low, add butter several tablespoons at a time, beating well after each addition. (If frosting appears soupy or separated after all butter has been added, beat on medium-high speed until smooth again, 3 to 5 minutes more.)

Beat in extracts and food coloring. Reduce speed to low; beat 2 minutes to eliminate air bubbles. Stir with a rubber spatula until smooth.

Source: adapted from Martha Stewart

Snowman Sugar Cookies


Cute sugar cookies....part deux!

These cuties were inspired by the snowman cookies I saw on Spring Lake Cakes. I think their cookies are actually much cuter, with rosy cheeks (I forgot to add that) and wonderful detailing on the hat. I was still very pleased with how these turned out though. I'm even thinking of making a mini version for my daughter's preschool Christmas pageant later this week if time allows.


I really love how the little snowflake looks on the hat. I got this package of edible snowflakes at my local Rite Aid and have used them on all sorts of winter related treats....cookies, cupcakes and cakeballs. They don't really taste like much and the texture is a little odd. They are made out of rice starch and feel very dry. However, for decorating and for $1.99 I couldn't pass these up!


For the sugar cookie and royal icing recipe, click HERE.

Source: decoration inspired by Spring Lake Cakes

Christmas Tree Sugar Cookies


After seeing so many beautifully decorated sugar cookies over the past year on some of my favorite food blogs, I decided it was time I tried to make some too. I am pretty proud of myself. For my first attempt, these Christmas trees look pretty good.

I loved these little candy balls and think they make great ornaments. I got them from a Wilton's gingerbread house kit. My kids decorated the house, but I saved a few of these for the cookies :)


They both LOVED decorating the gingerbread house. I got this kit at Micheal's for around $4 (with my coupon). A great deal for an activity that kept them BOTH occupied for almost 45 minutes.


The cookies...all wrapped up and ready to go!!


Sugar Cookies

Ingredients:


3 cups all-purpose flour
1 teaspoon baking powder
1 cup (2 sticks) unsalted butter, room temperature
1 cup sugar
1 large egg
1 teaspoon good quality vanilla extract

Parchment paper

Directions:


-In a medium bowl, stir together the flour and baking powder and set aside.
-In the bowl of an electric mixer, using the paddle attachment, cream together the butter and sugar until light and fluffy. This should take about 3 minutes.
-Add the egg and vanilla and beat another minute or so.
-Add the flour mixture slowly. (Be careful not to add too much at a time or you will have a snowstorm of flour.)
-Blend until all of the flour is incorporated and the dough begins to pull away from the sides of the bowl.
-Take the dough out of the bowl and place it on a piece of parchment paper.
-Using your hands, knead the dough a few times.
-Place the dough in a large plastic (Ziploc type) bag and refrigerate for about 2 hours. If you want to speed up the chilling process, place the bag of dough in the freezer for about 20-30 minutes. Just don't forget it in the freezer, or it will become to firm to work with (and then you'll have to wait for it to thaw).
-When it's almost time to remove the dough from the refrigerator (or freezer), preheat oven to 350 degrees (F).
-When the dough has chilled and is firm, take out about half of the dough, leaving the rest in the refrigerator (until your ready to work with it).

Source: Glorious Treats

Royal Icing

Ingredients:

4 Tablespoons Meringue Powder (I use Wilton Brand)
4 cups (about 1 pound) powdered sugar
6 Tablespoons warm water

Beat all ingredients until stiff peaks form.
*Make sure all bowls and utensils are totally grease-free or your icing will never reach proper consistency.
Spoon some of the thick white icing into individual bowls and add coloring.

For more details on how to decorate with royal icing, click HERE.